

 Monitor Utilities User's Manual


About this app
Monitor Utilities is a tool software that allows you to easily control displays with digital connections (HDMI, DisplayPort). It is designed so that most of the tasks can be completed using a window (GUI) and keyboard on your PC, so you can easily control the monitor remote control, set the tint, and solve DisplayPort problems.
Launching the app
This app works with .NET 6, a tool that helps the software to run. If the app does not start, please go to the Microsoft website and install the .NET 6 desktop runtime.
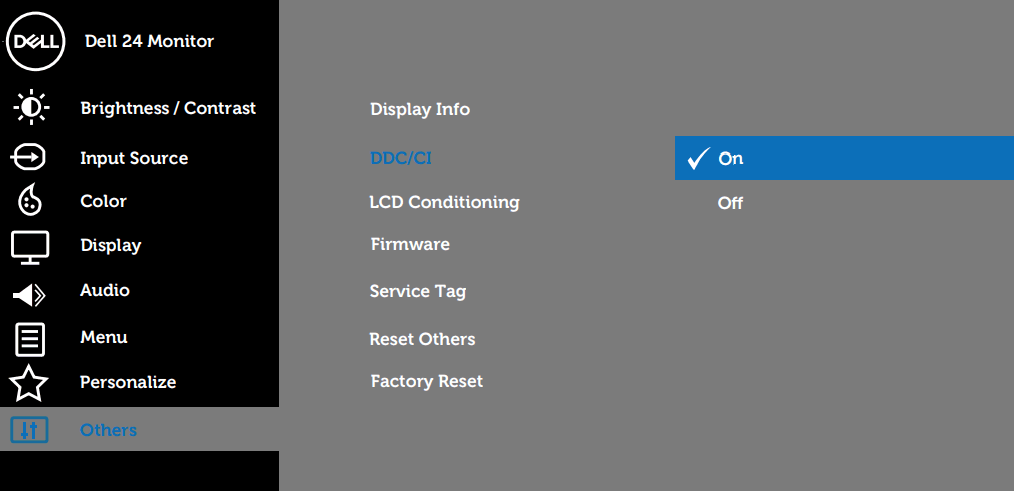
When you run this app, an icon will appear in the task tray and it will resident on your system. While the app is running, it can accept keyboard shortcuts and schedule execution. The monitors can be controlled by files with .lnk extension (Shortcut files with arguments) even when the app is not resident.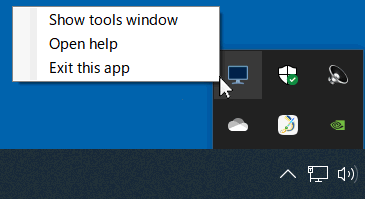 To operate the monitor from your PC, the monitor must be allowed to accept the control signals. Display the settings of the monitor and check if the "DDC/CI" item is enabled.
When you run this app, an icon will appear in the task tray and it will resident on your system. While the app is running, it can accept keyboard shortcuts and schedule execution. The monitors can be controlled by files with .lnk extension (Shortcut files with arguments) even when the app is not resident.
Show the tool
Right-click on the task tray icon to show a menu. By clicking "Show Tool Window" from that menu, a window for various settings and operations will be shown on the desktop.
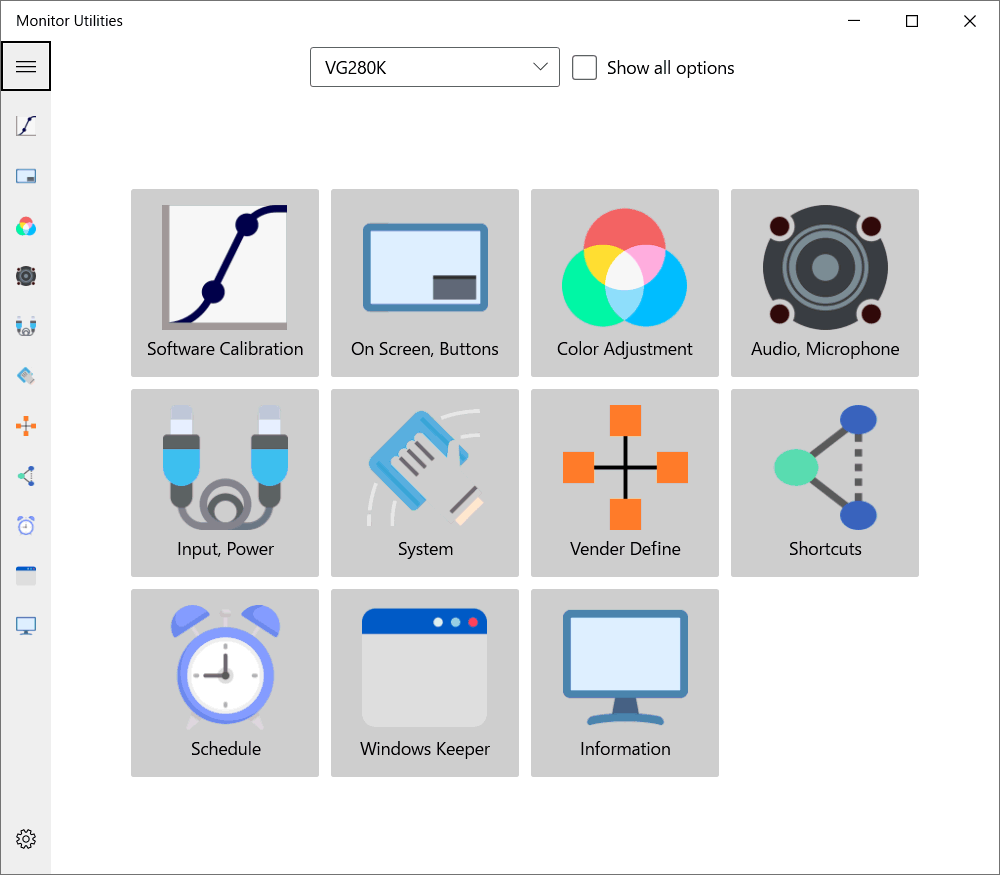 To select a tool from the window, click on the top buttons or the icons on the left side of the window. If you have multiple monitors connected, please select the one you want to control from the list at the top of the window.
By default, unsupported features are hidden based on the information received from the monitor you are connected to. You can force all features to be visible by checking the "Show all options" checkbox. This will allow the app to send signals that are not supported by the manufacturer, but may cause unexpected behavior.
By default, unsupported features are hidden based on the information received from the monitor you are connected to. You can force all features to be visible by checking the "Show all options" checkbox. This will allow the app to send signals that are not supported by the manufacturer, but may cause unexpected behavior.
Software Calibration
Changes the color of the screen. The changes will only be applied to the PC (OS) running the app, and will not affect other devices.
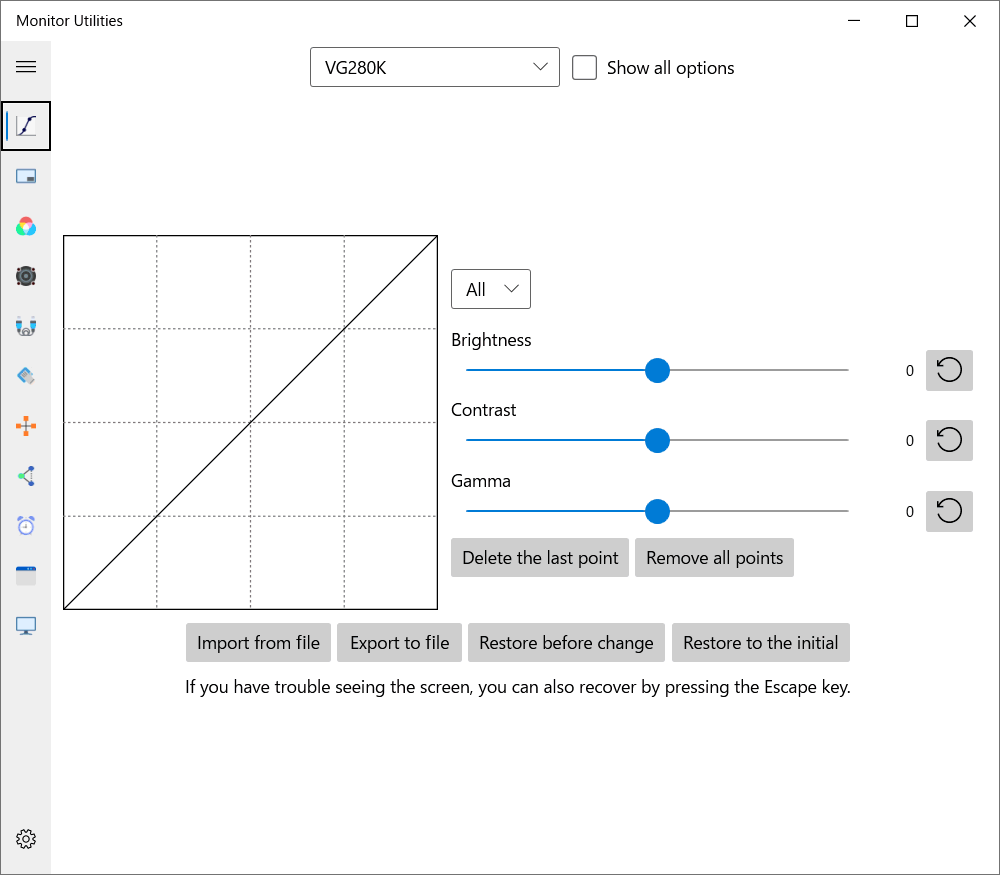 For basic adjustments, move the Brightness, Contrast, and Gamma sliders. If you want to make more advanced adjustments, use the tone curve on the left side of the window. Click on the grid to add a new point and create a tone curve through this point. You can move the placed points by dragging the mouse.
 If you select "All" in the list, the entire tint will be changed, but if you select "Red," "Green," or "Blue," you can adjust each color individually.
The data you edit can be saved and loaded as a file. This file is also used for colors applied in shortcuts and schedules. You should save the file to a specified folder (usually "C:\Users\(name)\AppData\Roaming\tnksoft\monutils\color") when you use it for these purposes.
If the screen becomes hard to see due to extreme adjustments, you can restore the status to what it was before editing by pressing the "Restore before change" button or the Escape key. You can also click "Restore to initial state" to recover to the state when the the app was first launched.
On Screen, Buttons
Operate the screen (On Screen Display) displayed on the monitor. "Software Control" enables you to control the buttons and switches mounted on the monitor from your PC. How the displayed button reacts on the supported monitor depends on the product.
Color Adjustment
It changes the color tone. Unlike software correction, it affects all devices connected to the target monitor because the monitor settings are changed directly.
Audio, Microphone
Adjusts the volume and range of the speaker and microphone embedded in the monitor.
Input, Power
Change the connection target of the monitor and operate the power. If the screen doesn't switch over after turning on the power, try checking the "Input source signal is also sent when the power is turned on" checkbox. After operating the Power ON signal, an additional signal will be sent to try to activate the monitor.
When you select "Shutdown" from the power mode, the main power of the monitor will be turned off. Therefore, once you perform the shutdown, you will not be able to turn on the monitor from this app unless you press the power button on the monitor side.
When you select "Shutdown" from the power mode, the main power of the monitor will be turned off. Therefore, once you perform the shutdown, you will not be able to turn on the monitor from this app unless you press the power button on the monitor side.
System
It mainly executes the initialization of the monitor. Initialization may cause some inconveniences, such as a change in the monitor's connection.
Vender Defines
App can send those commands by reading a json file that contains definitions about monitors that have their own communication commands. For more information on extension commands, please refer to the product's user manual or contact the manufacturer.
You can save the basic json file from "Output a template" at the bottom of the window. If you edit this file with a text editor, save it with overwrite, and push "Reload Defines" button, it will reflect those definitions.
You can save the basic json file from "Output a template" at the bottom of the window. If you edit this file with a text editor, save it with overwrite, and push "Reload Defines" button, it will reflect those definitions.
Move windows
This tool moves all windows on the desktop into the specified monitor. Some windows are not supported, such as apps that require administrator rights and system tools.
Remember window location based on monitor connection
The equivalent functionality provided by Windows 11 is produced on Windows 10.
Auto selection
Executing the shortcut key set here will move the window to the monitor where the current cursor or active window is located. If you want to always move to a specific monitor, select "Move Window" in the shortcut described below.
App filters
Apps registered in the list on this page will be able to control the movement. Window movement behaves differently depending on the combination of "Target app" and "Change window size". If "Search for window title" is checked, if the string specified in the filter is included in the title of a window, that window will also be the target of the move.
| Unregistered | Registerd, no resize | Registerd, resize | |
| All apps | Move and resize | Move only | Move and resize |
| In list | Not move | Move only | Move and resize |
| Not in list | Move and resize | Move only | Not move |
Screensaver
Runs an independent screen saver for each monitor.
Screensaver to start
Select the screen saver you wish to display on the specified monitor from the list of those already installed on your system. Note that some screen savers will not work properly, such as "Bubble" which displays the desktop of the main monitor, because it forces the original screen saver to be displayed on a separate screen.
Time to start
Specify the interval before starting if no keyboard or mouse operation is performed in the monitor. If the value is 0, the screen saver will only be started by an operation using the "Start/Stop Screen Saver" button at the bottom of the page or a shortcut. It will be deactivated by clicking on the running screen saver or selecting it in the task view.
Quit by window activation
It will be stopped by clicking on a running screen saver or selecting it from the Task View.
Quit by keyboard input
It will be stopped only when there is some keyboard operation in the monitor.
Quit by mouse (touch/pen) input
It will be stopped only when there is some mouse operation in the monitor.
Obey startup suppression by other apps
It will not start if the screen saver stopping function provided by a video player, etc. is enabled.
Desktop Connection
You can perform operations equivalent to "Display" in Windows System Settings for a second monitor or later displays. In "Switch Display", "Extend Desktop" and "Disconnect Display" are executed according to the current environment.
Pressing the "Register Shortcut" button enters the keyboard shortcut registration mode, and in this state, you can select the function you wish to assign to the shortcut by pressing the toggle button at the top. You can check and delete registered shortcuts from the "Shortcut" list.
The program regarding desktop switching is optimized for Windows 11 24H2. If you experience problems with desktop extensions on earlier operating systems, please check the "Use conventional desktop extensions" checkbox.
Shortcuts
Assign various controls of the monitor to shortcuts. Select the action you want to run from "Code" and "Value", and press the keyboard in the "Condition" input field to specify the key combination. If the key is not recognized clearly, press the button of the keyboard icon next to it and enter the text instead.
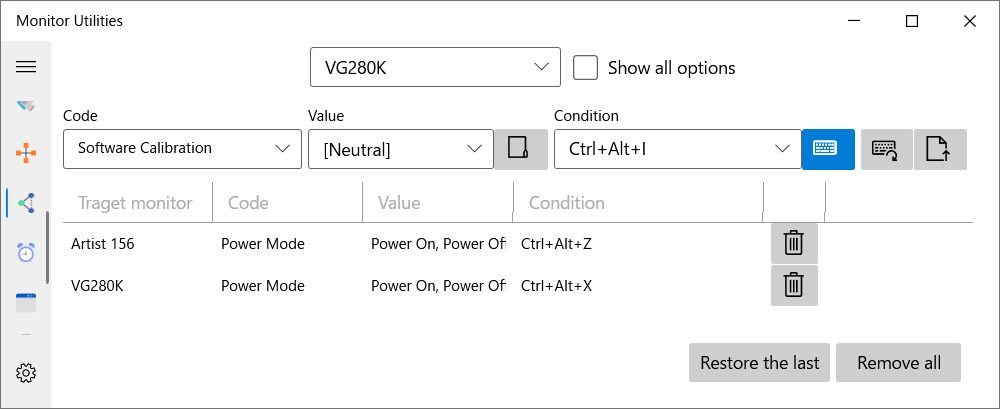 For items that have check boxes and can be multiple selected, the content to be sent will change depending on the current monitor status. For example, if "DisplayPort 1", "HDMI 1", and "HDMI 2" are checked in the input source, and the monitor is currently connected to "DisplayPort 1", it will switch to "HDMI 1", and if it's connecting to "HDMI 2", it will switch to "DisplayPort 1". When only one item is checked, that item will always be applied.
Click the "Add as a hotkey" button to the right of the "Conditions" field to add the item to the list. The added key input is valid as long as you close this window and keep the app resident. Registered keys are recognized at the system level, so simple keystrokes such as the "H" key only will affect keystrokes in other apps. Please Use the Ctrl+Alt combination whenever possible. Also, the "F12" key may not be recognized correctly because the system uses it priority.
Click the "Add as a hotkey" button to the right of the "Conditions" field to add the item to the list. The added key input is valid as long as you close this window and keep the app resident. Registered keys are recognized at the system level, so simple keystrokes such as the "H" key only will affect keystrokes in other apps. Please Use the Ctrl+Alt combination whenever possible. Also, the "F12" key may not be recognized correctly because the system uses it priority.
Schedule
When the specified time comes, the resident application will execute the registered action. As with "Shortcuts", you select the "Code" and "Value" and choose the time period in which you want this action to be run. If you set the start and end of the time period to be the same, the run of the action will be limited to when the app is launched.
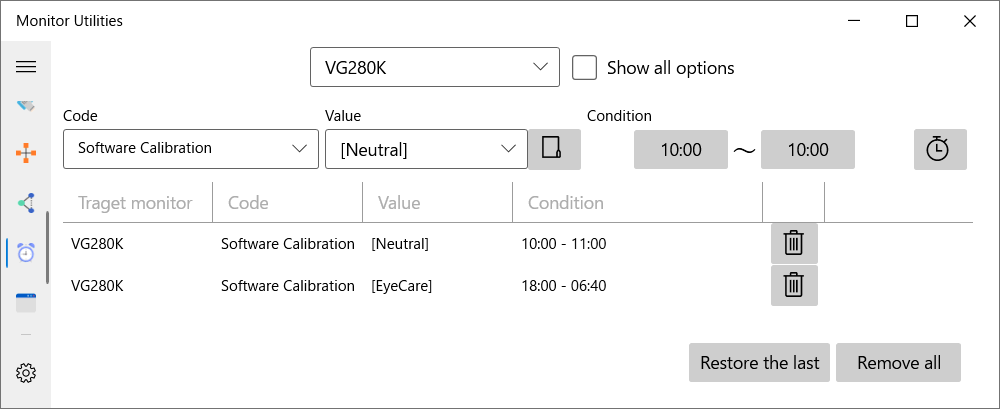 To avoid stress on the system and devices, orders will be run up to 10 minutes later than the specified time. If you want the order to be run as soon as possible, please change the timing from the settings below.
Information
You can see the information the app is using to identify the monitor and send/receive commands. If you find a bug in that app, please send this information along with your report to support. They will be one of the clues for me to solve the problem.
Settings
Configure the app settings.
UI Language
Select the language to be used by the app. The standard translation texts provided by the app are stored in the "locale" folder of the executable. If you do not see your desired language in the list, you can add a language or replace the message by editing these tsv files and storing them in the app's settings folder(usually "C:\Users\[name]\AppData\Roaming\tnksoft\monutils\locale").
Show the settings dialog when the app starts
Always show the tool window when you launch this app.
Make the execution time of the schedule strict
Generally, there is a delay of up to 10 minutes for the schedule to run, but you can remove that delay and have it run as quickly as possible.
Notify when control is executed
When the color tone is changed or the monitor control signal is sent, the notification is shown at the bottom of the screen. However, it is always shown in the trial version.
Restore color settings on resume
Give priority to apply the monitor color set by the application when sleep is restored or monitor settings are updated.
Timing of restoration
If it takes a long time between the return of the computer and the operation of the monitor, the restoration of position and color information may not be successful. In this case, please move this slider value to "Slow".
Resets the confirmation
Reset "Don't show again" checkbox state in all confirmation dialogs.
Trial restrictions and unlocking
While the app is running as a trial version, launching a shortcut or schedule will only display a message, but not actually control it. There is no trial period, and you can control the program from the tool window at any time.
If you have purchased the app but the trial version restriction is still not unlocked, please try editing your Windows settings again by carrying out one of the following before contacting the app store support. You don't have to do all of them if the problem has already been resolved.
If you have purchased the app but the trial version restriction is still not unlocked, please try editing your Windows settings again by carrying out one of the following before contacting the app store support. You don't have to do all of them if the problem has already been resolved.
- Update the OS with Windows Update.
- Go to [Start] > [Settings] > [Apps] > [Apps & Features], select [Monitor Utilities], and then select [Advanced Options] > [Repair] or [Reset].
- Reinstall the application.
- From [Start], select [Settings] > [Update & Security] > [Troubleshooting] > [Additional Troubleshooting] > [Windows Store Apps].
- Execute [WSReset.exe] from [Run] to reset the store app information.
Support
Support for this app, including questions and bug reports, is available via email or the contact form. Please note that any comments you write in the app store rating comments will not be seen by the developer.
It may take some time to respond because I am an individual developer, but I will do what I can to fix the problem.
It may take some time to respond because I am an individual developer, but I will do what I can to fix the problem.
Opensource license
ModernWPF UI Library / Copyright (c) 2019 Yimeng Wu
Alert Bar WPF / Copyright (c) 2014 Chad Kuehn
Alert Bar WPF / Copyright (c) 2014 Chad Kuehn
MIT License

Permission is hereby granted, free of charge, to any person obtaining a copy
of this software and associated documentation files (the "Software"), to deal
in the Software without restriction, including without limitation the rights
to use, copy, modify, merge, publish, distribute, sublicense, and/or sell
copies of the Software, and to permit persons to whom the Software is
furnished to do so, subject to the following conditions:

The above copyright notice and this permission notice shall be included in all
copies or substantial portions of the Software.

THE SOFTWARE IS PROVIDED "AS IS", WITHOUT WARRANTY OF ANY KIND, EXPRESS OR
IMPLIED, INCLUDING BUT NOT LIMITED TO THE WARRANTIES OF MERCHANTABILITY,
FITNESS FOR A PARTICULAR PURPOSE AND NONINFRINGEMENT. IN NO EVENT SHALL THE
AUTHORS OR COPYRIGHT HOLDERS BE LIABLE FOR ANY CLAIM, DAMAGES OR OTHER
LIABILITY, WHETHER IN AN ACTION OF CONTRACT, TORT OR OTHERWISE, ARISING FROM,
OUT OF OR IN CONNECTION WITH THE SOFTWARE OR THE USE OR OTHER DEALINGS IN THE
SOFTWARE.
Copyright
© TNK Software / Tanaka Yusuke