Pose Converter for Clip Studio User Manual


About this app
This is an add-on for Blender that converts FBX files with embedded motion data, motion capture data in BVH format, and MikuMikuDance motion files into pose data that can be used in 3D human body models in Celsys' Clip Studio Paint graphics software.
You will be able to easily and quickly apply a wide variety of poses to your models without having to adjust human body joints by trial and error in Clip Studio Paint.
You will be able to easily and quickly apply a wide variety of poses to your models without having to adjust human body joints by trial and error in Clip Studio Paint.
Install add-on
To run this add-on, the 3DCG software "Blender" is required, so please download and install the package from the Blender official website in advance.
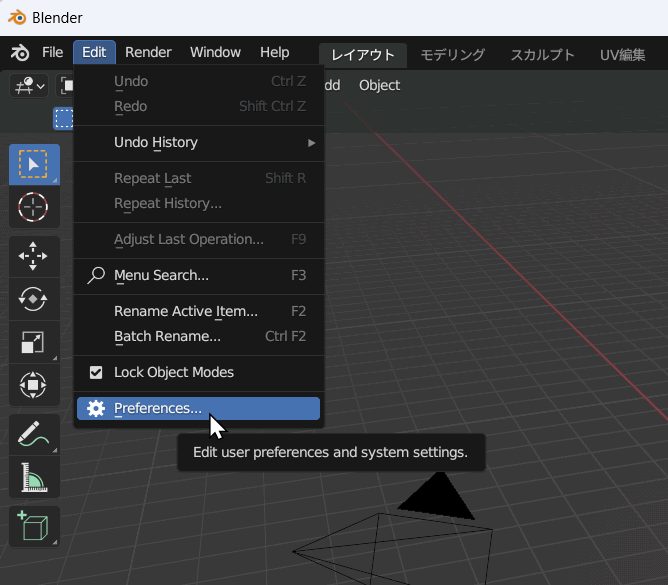
After starting Blender, select "Edit → Preferences" from the menu.。
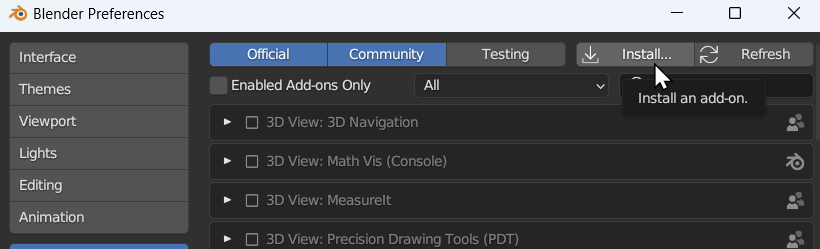
 Select "Add-ons" from the list on the left and press the "Install" button in the upper right corner.
 When the file selection window appears, select the downloaded file "bvh_to_pep.zip" and install it.
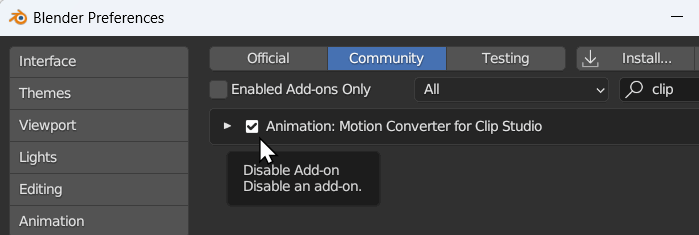
When the add-on is properly recognized, "Pose Converter For Clip Studio" will be added to the list, so please check this item to activate it.
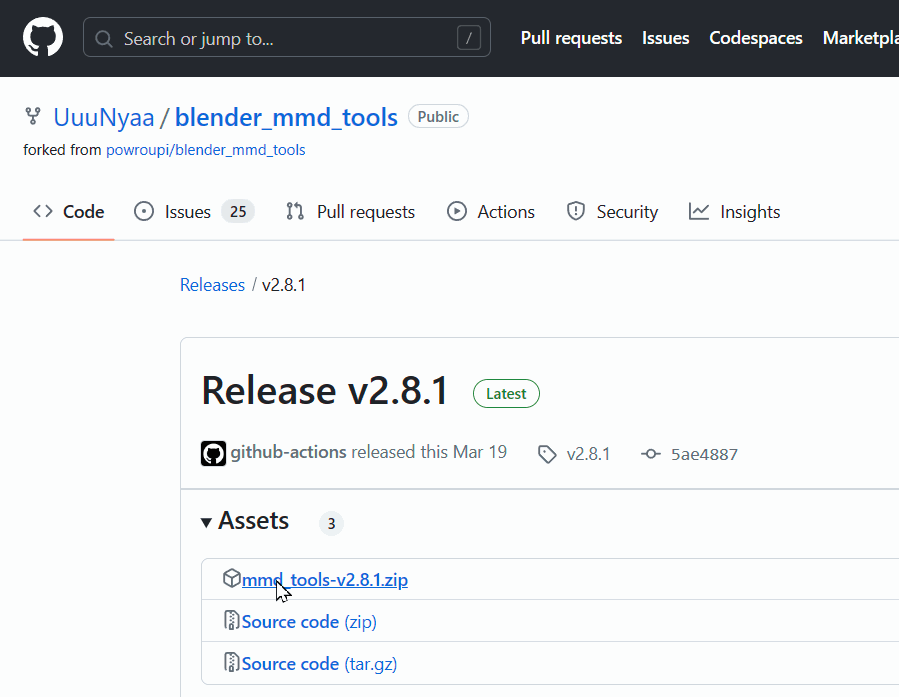
 If you want to import MikuMikuDance data, you will need the external add-on "mmd_tools". Download the latest version of the zip file from this distribution page and install it as an add-on in the same way as before.
After starting Blender, select "Edit → Preferences" from the menu.。
When the add-on is properly recognized, "Pose Converter For Clip Studio" will be added to the list, so please check this item to activate it.
How to use
Launch Blender, or create a new one, with a blank environment on the layout, then press the N key on your keyboard, you will see a toolbar on the right side of the page, click on the tab labeled 'PEP' and you will see a basic menu.
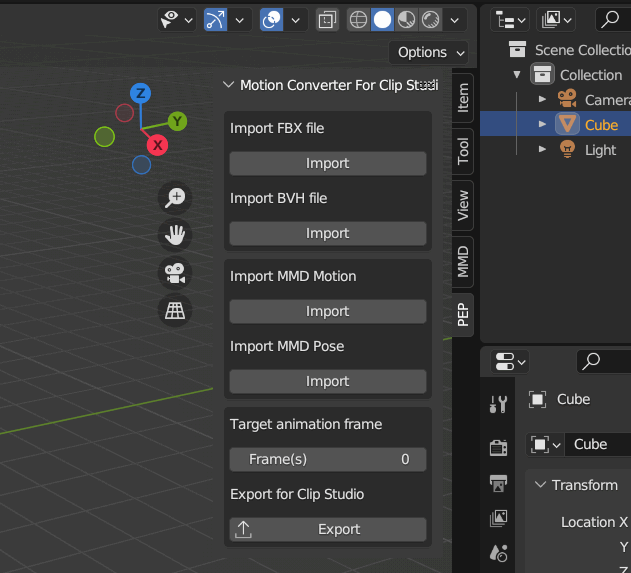
 The top two buttons allow you to load motion data from FBX files created by 3D graphics tools such as Mixamo or Rokoko, or from BVH files, a generic data format for motion capture.
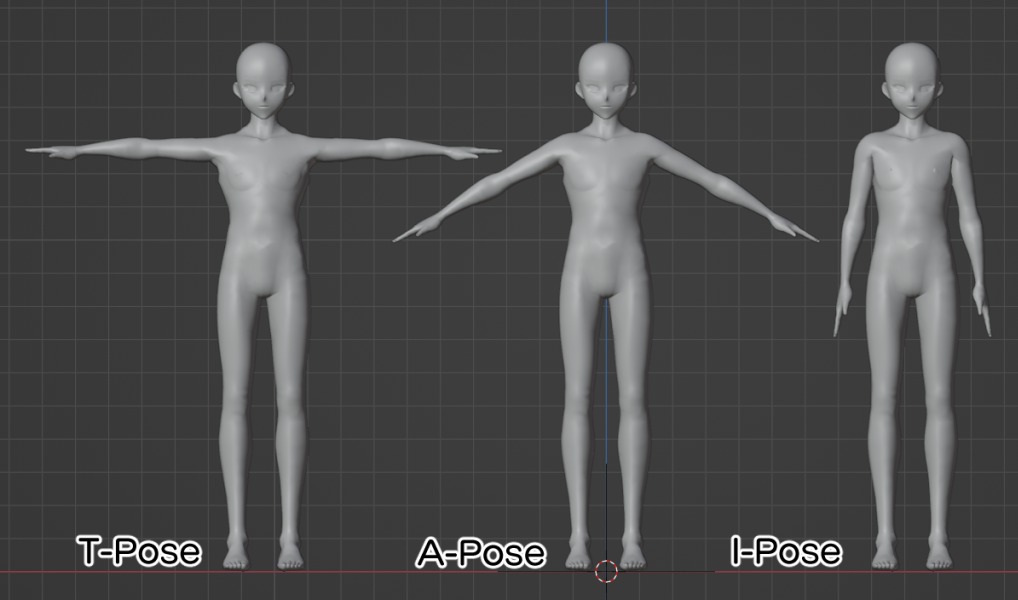
The option "Base Pose", which shows on the right side of the open file dialog, specifies the pose of the model with no motion applied to the motion data to be imported. Most models are in T pose (standing vertically with arms outstretched to the sides); the accuracy for models in A pose (standing vertically with arms slightly wholesale) or I pose (upright) is less than in T pose. So if it generates poor posture, please adjust the angle in the "Adjust arm angles" section.
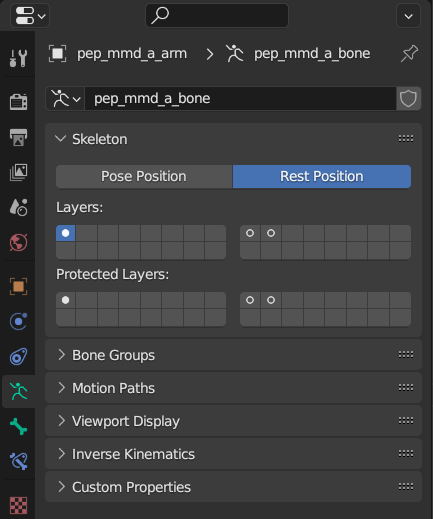
 The option "Reference Pose" specifies whether the rest pose or the pose the model is in at the first frame should be considered the "Base Pose". You can check if a rest pose is defined in the model to be imported, select "Rest Position" in the "Skeleton" information of the target model.
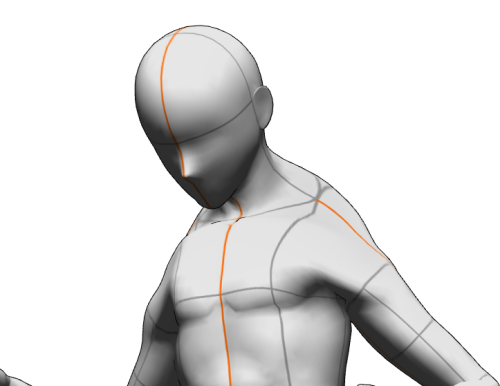
 The program automatically strings joint data, but if those names are not in English or use abbreviations (e.g. Shoulder as sldr), the stringing of joints will fail and the motion data will not be reflected correctly. In this case, please deal with the problem by changing the names of the joint data in the base model or motion as follows:
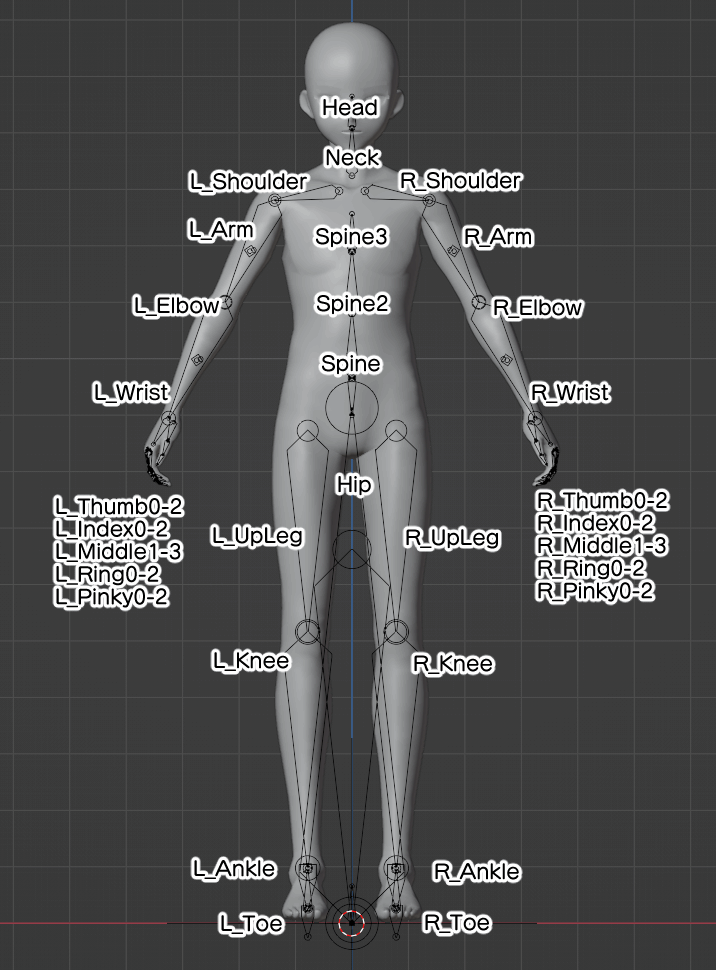 Some models have more joints than this, but those data are omitted during conversion, so there is no need to force a change.
If you want to import from VMD, which is MikuMikuDance motion data, or VPD, which is pose data, press the two buttons in the center. The options that can be specified during import are identical to those described in the Official Documentation, but basically do not need to be changed.
Depending on the model on which the pose is based, the shoulders may be misaligned. In this case, you can compensate by checking the "Adjust sholder" checkbox in the Import Options.
Once the file you want to load is specified, the motion data will be placed and transformed and optimized to match the Clip Studio model. Note that data with long motions (or very smooth motions) will take longer to convert, and Blender will seem to freeze while converting.
howto_frame
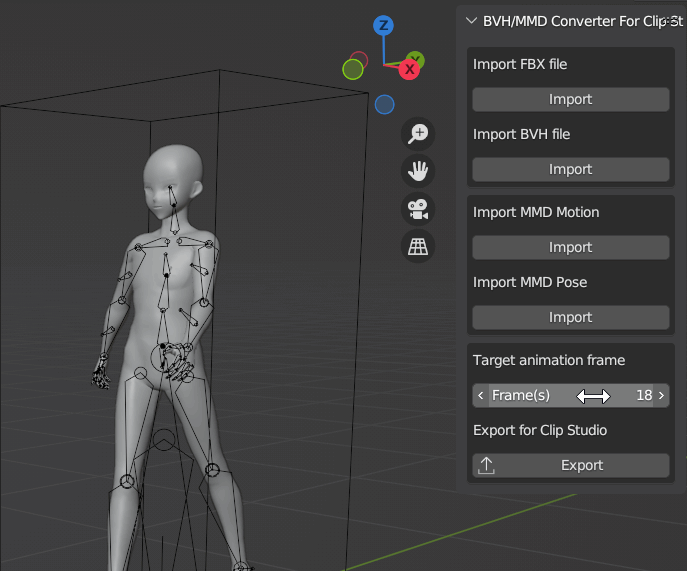 Once you have changed the animation frame and the pose you wish to incorporate into Clip Studio is displayed, press the bottom button "Export in Clip Studio format" to save it as a file.
If “Render thumbnail” is checked, the current model is saved as a thumbnail image in the same folder as the pose file.
Once you have changed the animation frame and the pose you wish to incorporate into Clip Studio is displayed, press the bottom button "Export in Clip Studio format" to save it as a file.
If “Render thumbnail” is checked, the current model is saved as a thumbnail image in the same folder as the pose file.
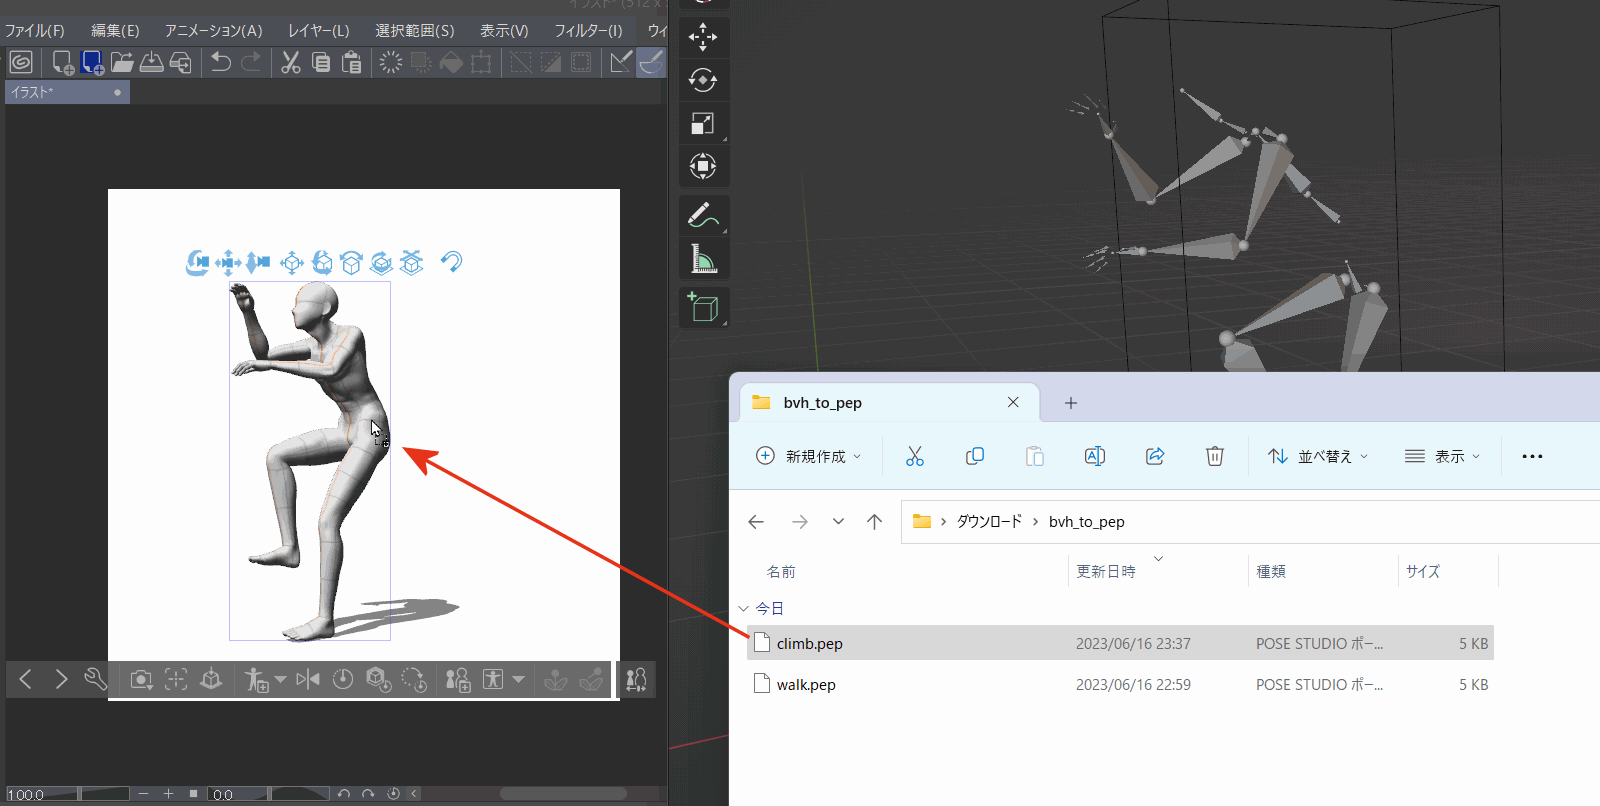
Drag and drop this saved file (.pep extension) directly onto the 3D pose model you wish to edit in Clip Studio Paint to apply the pose content. Due to differences in gender, height, physique, etc., between the original model and the motion, there pose will not match the original perfectly, so please adjust any unnatural parts in Clip Studio in a timely manner.
 The data containing the converted motion can be exported from this file again by saving it as a blend file.
If you want to load and edit another motion file because it will be affected by the pose data you are editing, you should delete all models on the layout by executing a new creation, for example.
💡
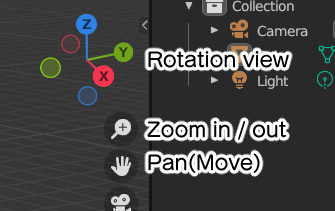
Drag the various icons in the upper right corner of the view to change the perspective.
💡
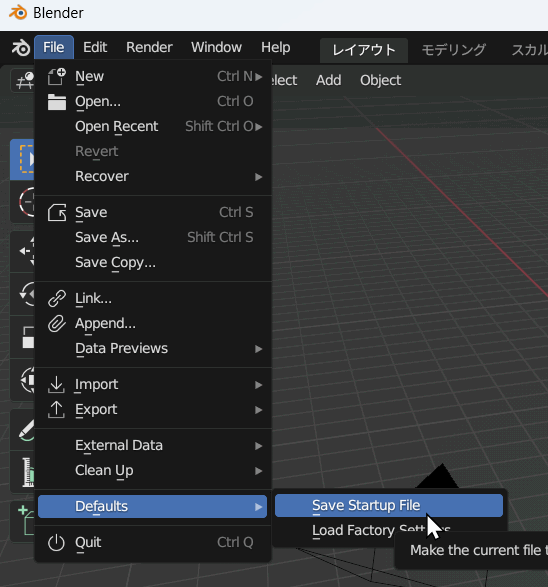
If the cube placed at startup is disturbing, you can delete this cube and then execute the menu ''Default -> Save Startup File'' to make the current state the initial state at startup.
The option "Base Pose", which shows on the right side of the open file dialog, specifies the pose of the model with no motion applied to the motion data to be imported. Most models are in T pose (standing vertically with arms outstretched to the sides); the accuracy for models in A pose (standing vertically with arms slightly wholesale) or I pose (upright) is less than in T pose. So if it generates poor posture, please adjust the angle in the "Adjust arm angles" section.
If you want to import from VMD, which is MikuMikuDance motion data, or VPD, which is pose data, press the two buttons in the center. The options that can be specified during import are identical to those described in the Official Documentation, but basically do not need to be changed.
Depending on the model on which the pose is based, the shoulders may be misaligned. In this case, you can compensate by checking the "Adjust sholder" checkbox in the Import Options.
|

|
| Before check | After check |
|---|
howto_frame
Drag and drop this saved file (.pep extension) directly onto the 3D pose model you wish to edit in Clip Studio Paint to apply the pose content. Due to differences in gender, height, physique, etc., between the original model and the motion, there pose will not match the original perfectly, so please adjust any unnatural parts in Clip Studio in a timely manner.
If you want to load and edit another motion file because it will be affected by the pose data you are editing, you should delete all models on the layout by executing a new creation, for example.
Batch Processing
By having Blender reference the included Python script fihttps://blog.nicovideo.jp/niconews/221262.html?conductorId=16217&frameMasterId=7le (script.py), data from a specific 3D model file can be output in a batch.
To execute the batch process, specify the script file in Blender's execution argument and then start it from the terminal (command line).
To execute the batch process, specify the script file in Blender's execution argument and then start it from the terminal (command line).
cd "C:\Program Files\Blender Foundation\Blender 3.6\"
blender.exe -b -P script.py -- -i C:\data\model.fbx -t -o C:\data\result\ -f 0.5r -p T
Parameters for output can be specified after "--" in Blender's execution argument.
blender.exe -b -P script.py -- -i C:\data\model.fbx -t -o C:\data\result\ -f 0.5r -p T
| -i | Specify the file to be loaded. | ||||||
|---|---|---|---|---|---|---|---|
| -o | (Optional)Destination for saving the converted data. If multiple files are output, only the folder name will be applied. | ||||||
| -f |
(Optional)Frame to output. You can specify the unit of frames by adding a letter at the end of the number. If omitted, the intermediate frame will be applied.
|
||||||
| -p | (Optional for FBX/BVH)Initial pose of the 3D model to be converted. Specify one of the letters "T," "A," or "I." If omitted, "T Pose" is considered the initial pose. | ||||||
| -s | (Optional for VMD) Enable shoulder position adjustment | ||||||
| -a | (Optional) Adjustment angle of the arms in the initial pose | ||||||
| -r | (Optional for FBX/BVH)State of initial pose. If "REST" is specified, the rest pose is assumed; if "CURRENT" is specified, the first frame pose is assumed. | ||||||
| -t | (Optional) Outputs a thumbnail image of the pose model. |
Tested List
| Service name | Base pose | Reference pose | Remarks |
|---|---|---|---|
| Mixamo | T-Pose | Rest | |
| Mocap.market | T-Pose | Rest | |
| Rokoko Video | T-Pose | Rest | |
| CMU Graphics Lab Motion Capture Database | T-Pose | Rest | |
| Bandai-Namco-Research-Motiondataset | T-Pose | Rest | Need to fix rest pose with converter(Converter program) |
| Ready Player Me Animation Library | I-Pose | First frame | |
| MoMask(Demonstration) | T-Pose | Rest | |
| Plask Motion | T-Pose | First frame | Need to specify when uploading video |
| QucikMagic | T-Pose | Rest | |
| Three D Pose Tracker | T-Pose | Rest | Disable "Blender coordinate system" (And press the Save button) |
| MikuMikuCapture | A-Pose | Rest | Export as BVH format |
| Meshcapade Me | T-Pose | Rest | |
| Metive | T-Pose | Rest | Requires MMD Tools plug-in |
| Mootion | T-Pose | Rest | Generated data will be published on Discord |
Support
For questions, bug reports, and other support related to the app, please send us an email or use our contact form. Please note that any comments posted in the app store comments section will not be sent to the developer.
I am a private developer, so please allow me some time, but I will do my best to address the issue.
I am a private developer, so please allow me some time, but I will do my best to address the issue.
Copyright
© TNK Software / Tanaka Yusuke
Rokoko Studio Live Plugin for Blender © Rokoko
Rokoko Studio Live Plugin for Blender © Rokoko